Shopify Klaviyo Integration: The Complete Setup Guide 2026
Shopify Klaviyo integration is the process of connecting your Shopify store to Klaviyo's email and SMS marketing platform so every customer action — purchase, browse, abandon — triggers a targeted, automated message. Klaviyo's own data shows that stores using its abandoned cart flow recover an average of 3–5% of abandoned checkouts, generating revenue that would otherwise be lost.
This guide walks you through every step: app installation, data sync, building your first three flows, creating segments, and embedding sign-up forms. By the end, your Shopify store will have a fully operational Klaviyo setup ready to generate revenue on autopilot.
Need a specialist to handle your Klaviyo integration alongside a custom Shopify theme? Prateeksha Web Design delivers end-to-end Shopify app integration services for DTC brands globally.
Get a Free Integration QuoteWhat Is Shopify Klaviyo Integration and Why It Matters
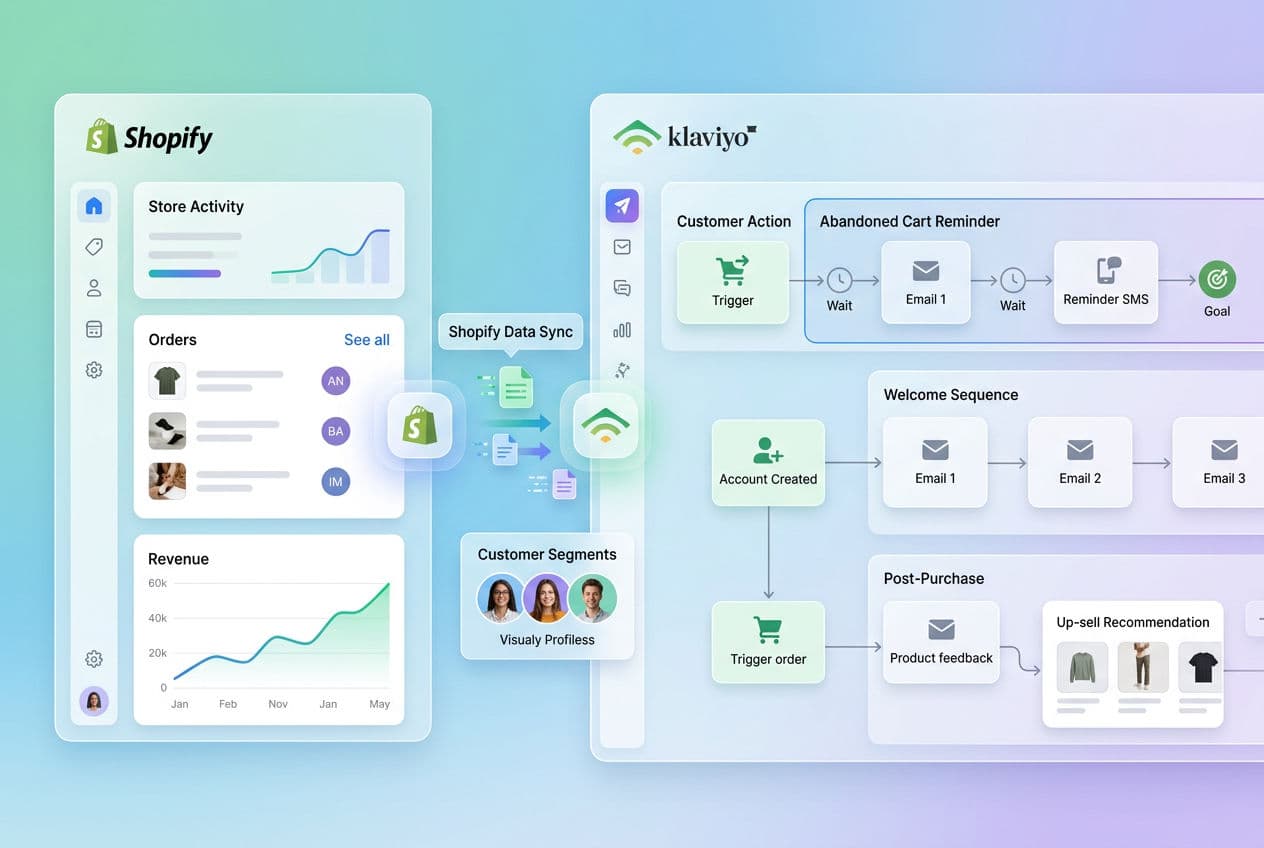
Shopify Klaviyo integration connects your Shopify storefront to Klaviyo's marketing platform via an official native app, enabling real-time data sharing between the two systems. Klaviyo processes over $15 billion in revenue for e-commerce brands annually, according to Klaviyo's 2024 earnings report — a figure that reflects how central email automation has become to DTC growth.
Without this integration, your email marketing operates blind: you send generic newsletters with no connection to what customers actually bought, browsed, or abandoned. With it, every email is triggered by real Shopify behaviour — making it relevant, timely, and profitable.
Klaviyo is purpose-built for Shopify. Unlike Mailchimp or Campaign Monitor, Klaviyo's Shopify connector syncs your full order history, product catalogue, customer profiles, and real-time event stream — so segments and flows work the moment you flip the switch. For deeper context on what makes a strong Shopify marketing stack, read our guide to top Shopify app integrations for 2026.
Step 1: Install the Klaviyo App on Shopify
Installing Klaviyo on Shopify takes under five minutes and requires no coding. Klaviyo is among the top 10 most-installed apps in the Shopify App Store, with over 130,000 active merchants using it as of 2024 (Shopify Partner Programme data).
- Log in to your Shopify admin and go to Apps > Shopify App Store.
- Search for Klaviyo: Email Marketing & SMS and click Install.
- Review the permissions Klaviyo requests (read/write access to customers, orders, products, and checkout events) and click Install app.
- Klaviyo opens in a new tab and asks you to log in or create a free account. If you're new, enter your business email and store URL.
- Once logged in, Klaviyo displays a setup wizard. Select Connect Shopify store and confirm your store's myshopify.com URL.
- Click Connect. Klaviyo immediately begins pulling your Shopify data.
You'll see a green confirmation banner: Your Shopify store is connected. The integration is live. Historical data sync begins automatically in the background.
Step 2: Sync Your Shopify Data with Klaviyo
The Shopify Klaviyo integration syncs six core data types automatically: orders, customers, products, refunds, checkout events, and catalogue data. Klaviyo's documentation confirms that historical order data up to two years back syncs within 24–48 hours for stores with under 100,000 orders — larger stores may take up to 72 hours.
After installation, verify sync is working correctly:
- In your Klaviyo dashboard, go to Integrations > Shopify.
- Check the Integration Status panel — it should show Active with a green indicator.
- Click View Sync Activity to see real-time import progress: customers synced, orders imported, and events tracked.
- Navigate to Profiles and confirm your customer records are appearing with Shopify order history attached.
- Place a test order in your Shopify store (use a test payment gateway). Within 60 seconds, the order event should appear in Klaviyo's Activity Feed.
If the test order doesn't appear within two minutes, go to Integrations > Shopify > Webhook Status and look for any failed webhook deliveries. A 5xx error usually means Klaviyo's webhook endpoint is temporarily unavailable — retry after 10 minutes.
Step 3: Set Up Your First Email Flows
Klaviyo flows are automated email sequences triggered by specific Shopify events. Klaviyo's 2024 benchmark report found that flow emails generate 3–5× higher revenue per recipient than campaign broadcasts — because they arrive at the exact moment of relevance. Set up these three flows first.
Abandoned Cart Flow
The abandoned cart flow targets shoppers who added items to their cart but didn't check out. Klaviyo captures the email address entered at checkout — even if the purchase wasn't completed — via its native Shopify checkout integration.
- In Klaviyo, go to Flows > Create Flow and select Abandoned Cart from the template library.
- Set the trigger to Checkout Started (Shopify event). Add a 4-hour time delay before the first email.
- Configure a 3-email sequence: Email 1 at 4 hours (gentle reminder + cart contents), Email 2 at 24 hours (social proof + urgency), Email 3 at 72 hours (optional discount — 10% off).
- Add a flow filter: Has not placed order since flow started. This prevents sending the sequence to people who already purchased.
- Set each email's sender to your store domain and customise the subject line. Best-performing subject for Email 1: You left something behind…
- Click Turn Flow Live.
Welcome Series Flow
The welcome series introduces new subscribers to your brand before they buy. Welcome emails generate 320% more revenue per email than standard promotional emails, according to WordStream's email marketing benchmarks.
- Go to Flows > Create Flow and select Welcome Series.
- Set the trigger to List: Subscribed to Newsletter (your main Klaviyo list).
- Build a 3-email sequence: Email 1 immediately (brand story + hero product), Email 2 at day 3 (social proof / testimonials), Email 3 at day 7 (incentive — first-order discount).
- Add a smart sending window: 9am–5pm in the subscriber's local timezone.
- Turn the flow live and monitor open rates. Target: Email 1 > 40% open rate.
Post-Purchase Flow
The post-purchase flow builds loyalty and drives repeat orders. Repeat customers spend 67% more than new customers on average (Bain & Company research) — making post-purchase automation essential for DTC profitability.
- Go to Flows > Create Flow and select Post-Purchase.
- Set the trigger to Placed Order (Shopify event). Add a 2-day delay after order delivery (use estimated delivery date from Shopify's fulfilment data).
- Email 1 at day 2 post-delivery: How's your order? — ask for a review. Include a product review request linked to your Shopify reviews app.
- Email 2 at day 14: Customers who bought X also love… — cross-sell recommendation block powered by Klaviyo's product recommendation engine.
- Email 3 at day 30: Replenishment reminder (if applicable) or loyalty programme invite.
Step 4: Build Klaviyo Segments from Shopify Data
Klaviyo segments are dynamic lists built from Shopify customer and order data. Klaviyo's platform processes over 30 billion data points per day from connected Shopify stores, making its segmentation engine the most powerful in the e-commerce email space.
Build these four segments immediately after data sync completes:
| Segment Name | Logic | Use Case |
|---|---|---|
| VIP Customers | Total order value > $500 AND ordered > 2 times | Loyalty campaigns, early access |
| At-Risk Customers | Placed order > 90 days ago AND not ordered since | Win-back campaigns with incentive |
| One-Time Buyers | Placed exactly 1 order AND order date > 30 days ago | Second purchase nudge with cross-sell |
| High-Intent Browsers | Viewed product > 3 times AND not ordered in 30 days | Targeted browse abandonment flow |
To create a segment in Klaviyo: go to Lists & Segments > Create Segment. Use the condition builder to select Shopify as the data source, then add the logic from the table above. Klaviyo updates segments in real time — a customer who makes a second purchase exits One-Time Buyers automatically.
Step 5: Embed Klaviyo Sign-Up Forms in Your Shopify Store
Klaviyo sign-up forms are the primary mechanism for list growth on Shopify. Klaviyo's data shows that stores using on-site pop-up forms grow their email lists 2.4× faster than stores relying on checkout opt-ins alone.
Add a sign-up form to your Shopify store in two ways:
- Shopify App Blocks (Online Store 2.0): In your Shopify theme editor, go to a page template and click Add block. Select Klaviyo from the app blocks list and choose Email Sign-Up Form. Configure which Klaviyo form to display and save.
- JavaScript snippet (all themes): In Klaviyo, go to Sign-Up Forms > Create Form. Build your form using the drag-and-drop editor. Click Publish, then copy the embed code. Paste it into your Shopify theme's
theme.liquidfile just before the closing</body>tag.
For custom Shopify themes — especially those built with bespoke Liquid — a developer can place the Klaviyo snippet in the correct template in under 10 minutes. Prateeksha Web Design handles this as part of our Shopify app integration services for every client build.
Recommended form types to deploy:
- Exit-intent pop-up — triggers when the cursor moves toward the browser's address bar (desktop) or after 20 seconds of inactivity (mobile).
- Embedded footer form — always-visible opt-in at the bottom of every page; captures passive visitors who scroll to the end.
- Product page inline form — Notify me when back in stock opt-in; converts high-intent visitors when a product is unavailable.
Common Klaviyo Shopify Integration Mistakes to Avoid
Most Shopify stores make the same five configuration errors when setting up Klaviyo. Klaviyo's 2024 deliverability report found that 34% of new integrations experience avoidable list health issues within the first 30 days — almost always from these mistakes.
- Not enabling double opt-in for cold lists. Single opt-in is fine for checkout subscribers (they gave explicit consent), but any list imported from a CSV or third party must use double opt-in to protect deliverability. Go to Lists & Segments > [List Name] > Settings and toggle Double Opt-In on.
- Skipping sender domain authentication. Klaviyo requires SPF, DKIM, and DMARC records on your sending domain. Without them, Gmail and Outlook will route your emails to spam. Add the DNS records Klaviyo provides under Settings > Email > Sending Domains.
- Running flows without suppression lists. Add your unsubscribe list, bounce list, and complaint list as exclusions to every flow trigger. Klaviyo does this automatically if you use its default suppression settings — verify under Settings > Suppression.
- Using a free email domain as the sender address. Gmail and Yahoo now enforce DMARC alignment for bulk senders. Sending from @gmail.com or @yahoo.com as a business will result in near-total delivery failure. Always send from your store's domain (e.g. hello@yourbrand.com).
- Launching all flows simultaneously. Start with the abandoned cart flow first — it has the highest ROI and lowest risk. Let it run for two weeks, review deliverability metrics, then activate the welcome series. Launch post-purchase last. Staggered activation protects your sender reputation during the warm-up phase.
Getting Klaviyo configured correctly the first time saves weeks of debugging. Prateeksha Web Design builds custom Shopify stores with all Shopify app integration services pre-configured — Klaviyo, Recharge, Yotpo, and more. See how we approach the full stack in our top Shopify app integrations guide.
Start Your Shopify Integration ProjectFrequently Asked Questions
Is Klaviyo free for Shopify stores?
Klaviyo offers a free plan for Shopify stores with up to 250 contacts and 500 monthly email sends. Once you exceed those limits, paid plans start at $20 per month and scale with your contact list. Most growing DTC brands move to a paid plan within the first 90 days of running flows.
How long does Shopify Klaviyo integration take to set up?
The basic Shopify Klaviyo integration takes under 30 minutes — install the app, connect your store, and historical data syncs automatically. Configuring your first three flows (abandoned cart, welcome series, post-purchase) typically takes an additional 2–4 hours. A complete setup with custom segments and branded templates takes 1–2 days.
Does Klaviyo work with Shopify's native checkout?
Yes. Klaviyo integrates directly with Shopify's native checkout, including the new one-page checkout introduced in 2023. Klaviyo captures email addresses entered at checkout — even if the customer doesn't complete the purchase — and fires the abandoned cart flow automatically.
What Shopify data does Klaviyo sync?
Klaviyo syncs orders (all historical and real-time), products, customers, refunds, and checkout events from Shopify. This data powers segments like 'purchased product X but not Y', 'spent over $200 in the last 60 days', or 'has not purchased in 90 days' — enabling precise targeting without any CSV exports.
Can I use Klaviyo with a custom Shopify theme?
Yes. Klaviyo works with any Shopify theme, including fully custom Liquid themes built from scratch. Embed sign-up forms via Klaviyo's JavaScript snippet or Shopify's app blocks (for Online Store 2.0 themes). Custom themes may require a developer to place the snippet in the correct template file — this is a 10-minute task for any Shopify developer.